

| English | Korean | Chinese | Japanese |
Chapter 5. VMS Client
Connect to the VMS Server
1. Click the  button to connect to the VMS server.
2. In the VMS server list, click the  button at the bottom of the list to add a new account. Or click the
  button to edit the server connection information.
3. In the connection edit dialog, enter the required connection information.
a. The Remote Port must match the number defined in the VMS server configuration. (The default value is 3300.)
b. The User ID/PW, which is also defined in the VMS server configuration, must have privileges for remote connection.
c. If you switch on I-Frame only live decoding, the VMS server will transmit only iFrames for live video.
d. If you switch on Auto Stream Seletion to automatically selects the most appropriate primary or sub-stream based on the video size.
· This feature is particularly effective for UHD cameras (e.g., 4K), which require significant decoding resources. For multi-channel display, a lower-resolution sub-stream is used to reduce system load. The UHD primary stream is used only for single-channel display.
· It is available only when the preferred streams for single- and multi-channel display are properly configured on the VMS server.
4. Once a client is connected to the server, its time will synchronize with the server. If the server and client are in different time zones, click the clock ( ) in the upper right corner to view the time difference.
5. In the main dialog, click the  button to configure settings. Changes are applied after the program restarts.
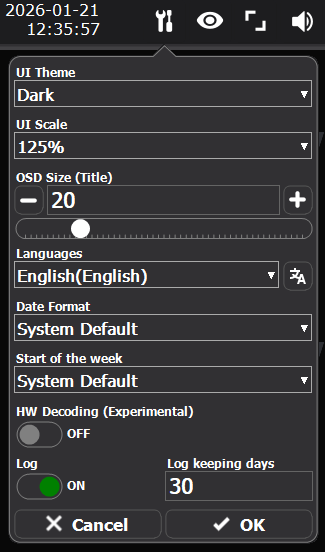
a. UI Theme / UI Scale: Set the light or dark UI theme, and the scale of the user interface.
b. OSD Size (Title): Set the OSD size of the channel title.
c. Language / Locale Information: Choose the display language and locale information. Changes are applied after the program restarts.
d. Log Settings: Below the connection information, you can set whether to write logs and the storage period. Logs will be saved at:
C:\Users\[UserAccount]\Documents\VMSClient\Log